WordPress, who have never heard about it? Obviously, most of us have already known. For those who have not yet know about it, it’s okay because you will know about it now. For your information, WordPress is known as one of the most popular blogging platforms and the amount of its users is not a few. If you know the search engine Google, the users of WordPress can be as much as the users of Google search engine. Using WordPress is not difficult. You just need to install WordPress. It’s very easy for it has the user-friendly interface. I am sure that you will use it fast because WordPress is designed to be easy for everyone. You don’t believe it? Let’s start to proof it in the next few days.
Below there is a little tutorial to help you to install WordPress by using “QuickInstall”. Maybe you will only need a few clicks if you have thought of the Blog Title that will be used, blog description, email as well as the password. If you have not prepared those, you may need more time because you need to think about the blog title that will be used 🙂 Therefore, before you start, it is wise for you to prepare everything first.
Installing WordPress in HostGator by Using “QuickInstall”
- Login to your cPanel.

- After login to the cPanel, click on icon/link QuickInstall

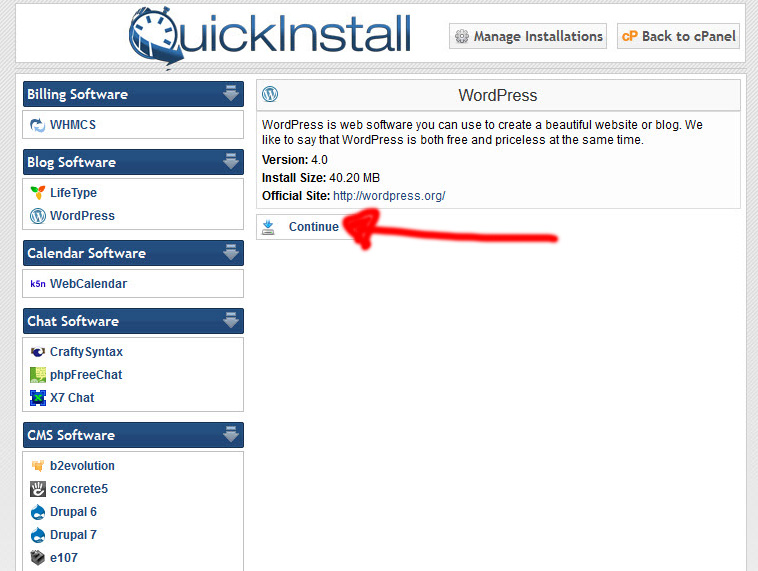
- At the left side, click a link that says WordPress.

- Just click WordPress and then click continue.

- At the Application URL part (the part where you will find the app in your browser): choose in what domain you will install WordPress. If this is your first time, there will be just one domain and you don’t have to choose.
- Note: This is the important part, so make sure that you don’t make mistake during the installation process. Let the column on the right side of the main domainblank if you want to install WordPress to the main site. Fill the column if you want to install WordPress in your subdomain. If you fill the blank column with blog writings, the WordPress will not be installed to your main site. Example: http://yourdomain.com/blog
- Fill in your blog title.

- The next step is you need to click “Install Now”.
- Wait for a few second because QuickInstall will install wordPress quickly for you if your internet connection is good.
- After the installation, there will be a notification that says “You have successfully install WordPress”. Copy the password given to you, it is necessary for you to be able to get into the dashboard part of your WordPress

Yup, that’s all. Installing wordPress to your hosting is easy right?


